Showing posts with label Slumping. Show all posts

Wednesday, January 29, 2014

A New Class! And New Exciting Toys!

I just wanted to let everyone know about a new class I've just added to my teaching schedule! I don't often teach night classes, but I've had so many requests for them, that I've added this one. 
Our New Front Door Sign! C'mon In!

Kiln Forming I

Learn the fundamental techniques required for functional fused glass art and sculpture. In this course students will be introduced to the working properties of glass including; compatibility, heating, design issues, and more. Students will work with sheet glass, rods, frit, stringer, enamels, and various inclusions to create a variety of projects. Students will gain knowledge of firing schedules and programming the kiln. Additionally, students will learn about cold working glass and related equipment. Student projects will include jewelry, plates, bowls, pendant lighting, glass wall prints, and cast glass sculptures.

In this course students will experience fusing, slumping, tack fusing, casting and weaving techniques. We’ll work with mold making techniques, drilling holes, and other cold working techniques to refine the work. We will also learn the basics of image transfer onto glass including; gel mediums, screen-printing with enamels, and so much more.

Here are the details:
The class will be 10 sessions and we'll cover A LOT! Workshop Fee $450, Materials Fee $175

Time: 6:30 pm - 9:30 pm 
Thursdays- 2/13, 2/20, 2/27, 3/13, 4/3, 4/10,4/17, 5/8Wednesday - 4/23Tuesday - 3/18


Here's the link to sign up for the fusing class. 

One of the links is the workshop, the other is the materials kit.

Looking forward to seeing you!  
Feel free to contact me with questions you might have!

I just wanted to share my excitement over my new toys! I ordered 3 new lap wheels in from Covington Engineering. They arrived a few weeks ago and I'm just getting around to hooking them up! Lisa and I are sharing an 18" wheel, and then I ordered a 12" wheel and a portable 8" wheel. Can't wait to use them!
The 12" Covington Lap wheel! I built a rolling stand for it so I can move it from place to place!

The 18" Covington Lap Wheel that Lisa and I are sharing!

Sunday, March 31, 2013

Las Vegas Glass Craft Expo, and other musings....

This week I venture off to Las Vegas for the Glass Craft Expo! I'm teaching 4 classes; Printmaking Techniques for glass artists, Electroforming on Glass, Glass on Metals; Torch and Kiln Fired Enamels, Modern Jewelry; Beyond Dichroics. I love teaching at this venue because of the mix of students. There are absolute beginners, intermediate level hobbyists, and professionals who make a living selling their work. In addition there are industrial design folks who make glass for tiles, architectural installation, etc. The manufacturers are also present at this venue, so there is a sense of discovery of all that is new and exciting in the field. Being a tool junkie myself, I find it irresistible. if you haven't been to the show, and you are involved in glass, make it your business to go. It's a ball! Just make sure you have money in your pocket, because you will be tempted by all the goodies. See ya when I get back! If you are there...come visit me in Las Vegas! We're at the South Point Hotel and Convention Center  I am in classroom GBB1!  See you there!


This is titled "Good Girl." It's screen printed with enamels. I used Flexi-glass medium and french vanilla powder to create the "torn paper" effect for the background. On the final slump I rubbed some of the enamel from the front into the grooves on the back to color the back a little more of a blush tone. I think it worked out well!
Can anyone guess who this is?...and it's not Marilyn.

This piece is bronze, silver, and copper. It's kind of simplistic and organic.  I like it because it reminds me of the jewelry made during the Bauhaus period (1917-1929). It is true to the materials. It kind of looks like coffee beans, but that's not what I was going for. 

This is my first finished encaustic mixed media piece.
I got to play in my studio and I really wanted to try something new.
I'm still trying to figure things out with this wax stuff, but I really like it!

This piece is 8" x 8".  I love doing mixed media pieces. This is tissue, photos, stamps, wire, paint, and hardware.
I'm looking forward to dong this on a large scale, but I'm learning a lot doing these in these smaller scale.

Sunday, October 7, 2012

Just a few experiments!

The last few weeks I've been teaching lots of classes and just trying to get back on track after the trip.

I think I'm getting things where I want them. Here are a few of my quick experiments on new screen printing ideas.
3 sushi plates! The 2 on the ends are completely smooth, and fully fused. The middle one has texture.


The female freedom fighter is ghosted over the landscape.
The mixing bowls and whisks have Hedy Lamar completely perplexed!

Monday, April 30, 2012

Last Week into This Week...

It's hard to believe that it's May 1st tomorrow. How is the time flying so fast! As usual, I'm a busy bee with all kinds of buzzing going around.

Here's the recap:

Grad School: I turned in my final 3000 word paper today! Yeah! Now I have just one more week of reading and blogging ahead and I'll be done for the semester. I'm glad I only took this one class to get my feet wet, 'cause it was a commitment with everything else going on. I don't know if school will get harder or easier, but I'm glad I'm doing it. This was a great class! Thanks to Ed Check, my TTU prof! The class was Research Methods in Art. I'll publish my paper if I get a decent grade, so you all can read it. It's revealing!

WD: This week I had a few classes; Drop Ring Vessels and PMC Silver Beads. Here are some pix!

These are 2 drop ring molds with their happy blanks sitting on top. It's important to make sure they are level before you fire them, so here's the bubble level on top....hope I removed that before firing! Both molds needed slight shimming to make them level. I'll post after pix when done!
Here's a PMC Silver lentil bead, it's approx. 1.5" It's hollow!

This is a glazed bisque bead with a PMC ribbon wrapped around it. This was fun to do. This bead is 1.75" It's almost too big. But i'll find something to do with it to make it cool and wearable.

This is a bisque bead that was painted with PMC and then PMC clay was applied. It's about  3/4". The other side has a cool leaf imprint.

This one is my favorite! This is a hollow PMC bead made by painting PMC slip onto a cotton armature, then layering clay and syringe over that. It's approximately 2" tall, and even though it's hollow, it's heavy. When fired, the cotton armature burns out and leaves the inside hollow. We're carrying the cotton armatures and the bisque beads at the shop if anyone wants to try this. SO COOL!

Also....Denise Leone will be arriving at Wired Designs studios on Wednesday to teach her class. I'm so looking forward to it. We still have one open spot if someone wants to jump in last minute. I'm excited because we're using Rapid Mask! it doesn't need a wash out! YEAH!!!!

Commissions: The vases for the the church in college station turned out great. They are still cooling in the kiln so I'll post pix of that tomorrow with the drop rings. The Alvarez gray metallic sink is slumped, but...alas....not all goes as planned and the rim is crooked, so I'll have to spend an hour or so grinding the darn lip. I know it make the vessel sink look even more stunning, but I'm kind of lazy, so I was hoping I wouldn't have to do it.

Luann's sink turned out gorgeous, but the casting was just a little too thin, so it had to go back into the kiln with more glass. Here's how that looked.


I added 2 more half sheets of color and some clear medium grit to bulk it up. Hopefully it won't change the color much, because the blank was gorgeous and the client approved us to go to the next step.

Saturday, April 21, 2012

What's Happening this Week?

It's been quite the busy week! 

I've had private classes with my pal Elizabeth and I'm afraid she's gotten more than she bargained for. We worked on color chemistry and reactions and some of the projects didn't work out as she'd planned, but she now has segued into strip construction and pattern bar creation because we've cut up a few of the disasters and are using the pieces in different ways!  I can't wait for her to see the finished product, because they are goon blow her away. I'll show you guys when they are complete!  

Also, bravo to Will! He's going to high school at Winston School! He had to do 2 days onsite as a student and be evaluated by the staff, and at the end, they invited him to attend! We're very excited for him! But it means a 55 minute drive every morning and evening....eeek! Car pool anyone??

Oops, this is from a few weeks ago. It's a demo from my beginning glass class fusing class. Here's what I did with it!

I'm also working on 2 vessel sinks! This one is for my friend Luanne's new powder room. It's gorgeous! I'll be cold working this one this afternoon.


The second one is from a customer in California. It's 4101.31 and 1429, for those of you who know what that is! I'll post a picture of that tomorrow!

Grad School is going well! Just one month left of this semester, which means; one more book (gotta read 90 pages today), 16 more blog postings (about 4 per week), 1000 more words to add onto the final paper. So far I'm doing ok! 

The weather is heavenly here right now! I slept with the windows open last night, which is not the norm here in cedar pollen land, but it was wonderful! Thanks g-d!

Saturday, April 14, 2012

Long time no blog!

Yesterday Rene taught a great soldering class. Here's Luanna's first soldered pieces. I'm so proud!

Here's what I've been up to:
I've been teaching a lot since I got back from Vegas but its all good.

Heres some of my class demos

Plus, I've been electro forming like crazy. All of the Vegas samples need to be done and sent out. I feel like a real science geek! But I love it!

Mostly I'm missing my Vegas buddies whom I can't talk to right now cause I'm so crazy busy.

I love that I've been able to be so productive!

Thanks to Nicole and Lisa who were such awesome Vegas buddies! Xo


Sunday, February 19, 2012

Beautiful vases!

I'm so glad that we are at a good place in this project. We have completed 35 of the vases. They look beautiful. Only 10 more to go! It is 2/19, and the event is on 2/28. We will make the deadline with time to spare! Looks like I'm just a worrier.

Beth, if you are reading this take heart. They look great! I'll be adding additional colors so we get even more vibrancy. Can't wait to see them all lit up at the City Year event.
We've done 35 of these so far and they are beautiful!

Thursday, February 16, 2012

Finally! There should be confetti!

Those of you who have been watching for this... here it is! 


It's been rough sailing to get to this point, but I'm much closer now. After a LOT of virtual blood, sweat, and tears over these vases, the first 8 came out of the kiln this morning.  Perfect they're not, but they're pretty good, I'd say!  I know they will glow beautifully with candles in them. They'll be on the tables at City Year's Gala event on February 28th!

8 DOWN, 37 TO GO!...there are 8 more in the kiln now.

If I can keep this up with no casualties, we'll make the deadline and be ok. Keep us in your prayers!  Tonight Rene is coming in to help me recycle some of the glass in the ones that turned out poorly, so they'll go into new discs, which we'll then re-drape. Unfortunately, we lost about 25 pounds of glass in the great meltdown disater of Feb 10th, so we'll be breaking up more and casting a new batch of red ones. The folks at Bullseye should be pleased, all toll, this project has used 175 pounds of glass!

8", 9" and 10" vases in multiple colors
Thanks so much for your kind words of encouragement, and offers to help!  Still might need some of that help yet. Fingers crossed!

Saturday, February 11, 2012

Troubles in Glass Paradise!

If you've been following the saga of the 45 draped vases for City Year's gala event on February 28th, no doubt that you're wondering, "So ...what happened?" So... Here's where we are on the project. 

I'm rather frustrated over the events that have occurred over the last 10 days. It seems that my in my exuberance to plow through the project, I failed to acknowledge that the draping portion of the project would be more nuanced than expected. I've done this numerous times before without any real pain or heartache so I foolishly assumed that this project would be no different. DUH!! Not so much!

The first batch of 9 that I attempted to drape were a horrible disaster. As I was placing them in the kiln, on top of the molds, Stacey (my business partner) said, "I think you should do just one. You know, to make sure that your schedule is right."  In my excitement and (foolish) confidence I replied, "Relax...I know what I'm doing. Anyway, I'm being conservative with the schedule, so I'm sure it will be fine." FAMOUS LAST WORDS! 

I opened the kiln the next day and there were beautiful gem colored rings sitting at the foot of each mold. My conservative schedule was wrong! All the discs had melted right through the molds and ended up in a heap. I was convinced that I new  what was wrong with the schedule, so I again FooLiSHLY put 9 more discs (what was I thinking?) onto the molds, and fired up the kiln again.

This time, the schedule was good! Yeah! But my happiness so gave way to the sad realization that the lips on the vases were WRONG!  

Ruffled... and not so much!

The size was right, but the lip was NOT ruffled as it should be.  Now I had screwed up 18 of the 54 discs that I cast, and I needed 45 vases. EEEEK! 

Here's where we are now; I realized that what was wrong with the lips of the vases is that the discs were too thick to ruffle. The way to thin them out was to put the discs back into the kilns and fire them to a very deep fuse (un-dammed) to allow the discs to thin and expand in size. So I did that and then draped them again using the new schedule. The result; GREAT! Everything was perfect.... except....(cue the music from the movie Jaws...) That the bodies of the vases were too thin. This means that either the temp was too high or time was too long, or both. 

Meanwhile, that meant 3 more discs bit the dust! So I had to regroup and reclaim the discs that I ruined. Stacey helped me smash up all the discs, and everything had to stop while I recast 18 of the discs back to usable condition.

Finally, yesterday I cold worked 49 discs and put 12 in the kiln to spread into thinner and larger discs. I will have to do that on all of the discs. So at 12 discs per day, that will take me to 2/14.

On 2/15 I will have 13 days left until the event! OMG! ...and not one perfectly ruffled vase to show for a month on the job. DAMMMMMMM.

I'm sure that I can pull this off in time, but it might mean that I am driving these vases to the event on 2/28! If all goes right with the kiln universe, I can drape 9 vases a day beginning on 2/15. That will take me to 2/21. It doesn't seem likely that it will happen just that way...but a girl can still dream! I will be in the studio every day making this happen.

Not toasty at all!
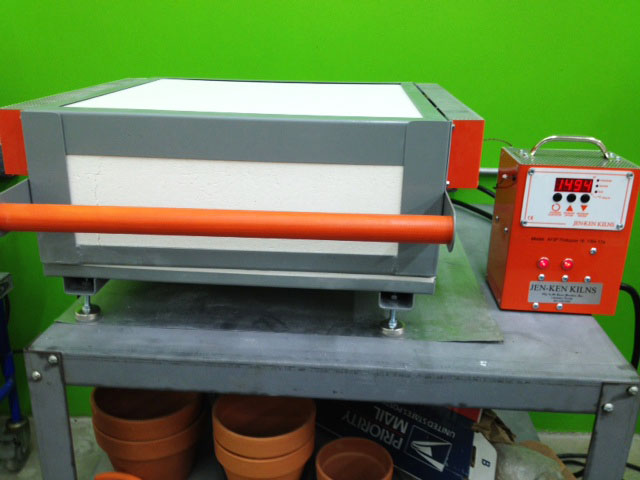
On a happier note, I am excited to be playing with my new Jen Ken Pro-Fusion 16 Square kiln. This thing rocks! It reaches full fuse (1470) in 39 minutes! That is killer fast for a 16" firing space. LOVE IT! I love that at 1492 degrees I can put my hand right on the top and hold it there without being burned, or even uncomfortable. Can't do that with a kiln wrapped in metal! Here she is in all of here glory!

I love that she's a clam shell too!

During the firings of the discs, I've been working on getting ready for my classes in Las Vegas. One of my classes is "Making Your Mark; Printing on Glass," and another is "Modern Jewelry; Beyond Dichroics." For both classes I'm exploring with images on glass that will come from woodcuts, stencils, stamps, free hand application/drawing, photographic images on overlays, etc. which will then be colorized with enamels, frits and powders, paints then and over or underlayed with foils, lusters, etc. 

These are some of the samples I put into the kiln last night. I put them on 0113, 0137, 0139, 0132, and 1100 to determine which colors give the best contrast and results. I'll take a picture tomorrow and show you how they came out.

All of these images I created from free clip art and vintage photos from the web. I manipulated and changed them for my purposes by eliminating backgrounds and increasing contrasts.

Friday, February 3, 2012

Another Beautiful Vessel Sink!

Just finished today!  You're seeing it before the client. This beautiful vessel sink will reside in the guest bath in a custom home here in San Antonio. The house is being built by Davis Homes. The design was inspired by the clients marble vanity slab, which is silver/gray with lines of cobalt blue and flecks of white and deep green. The interior designer, Debbie Stoli, is working with the clients to make their home a gorgeous place. I love working with designers because they really see lots of design possibilities when I start pulling out the glass. I think this glass vessel sink turned out beautifully!

This glass vessel sink is transparent steel blue-1406
and clear fracture irid 4101.31

Here's a close up of the texture and the drain.

....and another picture just because I love it!

Last night I taught a mini-class on torch fired enamels. We made some fun copper earrings and other little goodies!  Here's a few photos.

Charlotte and Rene torching away! Having a great time!

Charlotte's first enamel project!  Pretty great for a beginner!


Tuesday, January 31, 2012

Draping/Slumping in the kiln!

Finally the first batch of discs is in the kiln slumping!  Here's a little walk though my last few days on the project. I'll have a lot to show you tomorrow!

Here are the slumping molds. They've been sprayed with Boron Nitride and elevated on 12" kiln posts. I did that so we didn't have any folding or touching of the kiln shelf.
These are the final discs that I did. Several shades of ambers.
Here the discs have been cold worked, washed well, and placed on their molds.
Here is the Hendrick's sink in the mold. It will be finished tomorrow! Yeah!
Then I'll drill the hole and do the countersink on Thursday.
The glass needs to rest and stabilize before I drill the hole.
This is the demo tack fuse piece that I did with my beginner fusers class.
It's mounted in a frame and surrounded by frit. The piece is 6" square and the frame is 8".
It really pops!


Sunday, January 29, 2012

At the half way point!

I took a well deserved break from my 150 pound glass project. I've cast 54 of the 10" discs, prepped the molds, and am finally ready to cold work the first batch of 9 that will go first.

I've decided to slump a mix of colors together in case a batch somehow gets ruined, then I won't loose an entire color family and have to do an additional 25 pounds of glass.

The Hendricks' sink is cold worked and looks fantastic. The mold is prepped and ready!

Monday morning will be quite busy, but I'm looking forward to it.

I'm off to play in a charity mahjong tournament. This ought to be comical since I haven't played in a few months. Wish me luck!

Tuesday, January 3, 2012

Tah Dah! Here's the Finished Bowl!

The beautiful Baptismal Bowl for Zion Lutheran Church Font is finally done. The deadline is January 11th, so I'm totally excited that I'll be able to deliver the job early. That doesn't happen often! This bowl is 16" in diameter and about 4.5" deep.

This is the front view. I wish there wasn't so much glare!

This view is just a little further up.

This view is on top, looking into the bowl.
The rim actually came out very nicely. It's always a bit of a gamble, even when you do everything right. I'll take a photo tomorrow of the bowl in the font stand in the sanctuary so you can really see it in it's home!

Also, I cut a boat load of dichroic glass today... Here's a little bite to wet your appetite!
This is rainbow, granite, ripple on back- COE 90...YUMMY!